


Health Information


FIFA 11+ Warm-Up: The Proven Injury Prevention Programme Every Footballer Should Use

FIFA 11+ Warm-Up: The Proven Injury Prevention Programme Every Footballer Should Use (by Sportsperformance Physiotherapy)
With the World Cup almost here, you're about to watch the fittest athletes on the planet perform at their peak. But before the first whistle blows, there's something happening on the training pitch that you won't see on match day—and it's backed by years of sports medicine research.
It's called the FIFA 11+, and it's not just another warm-up routine. It's a scientifically proven injury prevention programme for every footballer across the globe — from the World Cup stage to the Sunday league pitch.
The programme has three structured parts: running drills, strength and balance exercises, and high-intensity cutting movements. It requires zero equipment and takes just 20 minutes.
What Is the FIFA 11+?
The FIFA 11+ is a structured, evidence-based warm-up programme developed by FIFA's Medical Assessment and Research Centre (F-MARC) and targeted at football players aged 14+. It was designed with one primary goal: to reduce the most common injuries in football, particularly those affecting the lower limbs.
Unlike a traditional warm-up of jogging and static stretching, the FIFA 11+ is a complete neuromuscular training protocol. It's divided into three distinct parts, each with a specific physiological purpose:
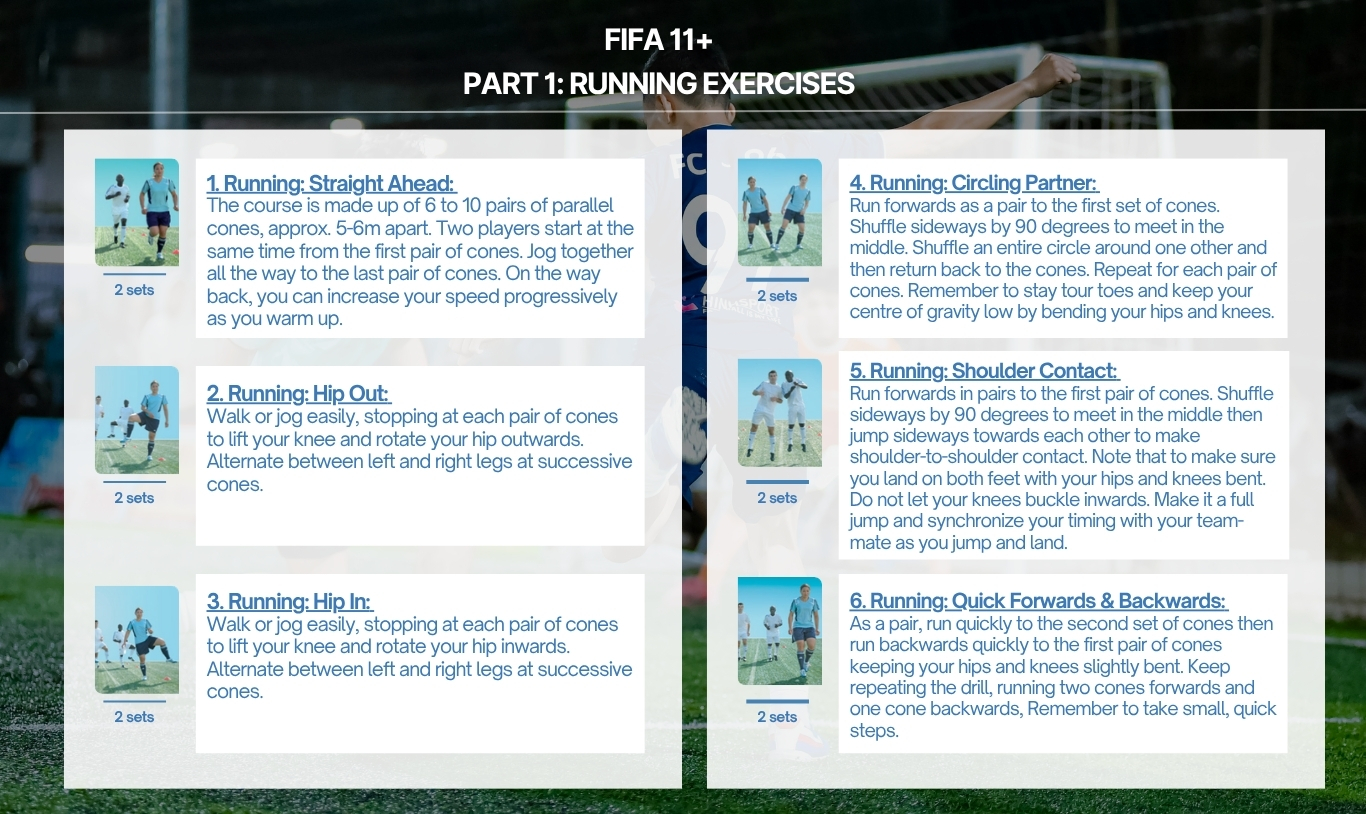
- Part 1: Running Exercises (6 exercises – 8 mins). These are dynamic movements performed at a gradually increasing intensity. Think straight-ahead running, hip-out running, hip-in running, circling a partner, shoulder contact jumps, and rapid forward and backward sprints. The goal here is active warm-up of the cardiovascular system, dynamic mobilisation of the major joints, and initial activation of the lower limb musculature.
1) Running: Straight Ahead:
The course is made up of 6 to 10 pairs of parallel cones, approx. 5-6m apart. Two players start at the same time from the first pair of cones. Jog together all the way to the last pair of cones. On the way back, you can increase your speed progressively as you warm up.
2) Running: Hip Out:
Walk or jog easily, stopping at each pair of cones to lift your knee and rotate your hip outwards. Alternate between left and right legs at successive cones.
3) Running: Hip in:
Walk or jog easily, stopping at each pair of cones to lift your knee and rotate your hip inwards. Alternate between left and right legs at successive cones.
4) Running: Circling Partner:
Run forwards as a pair to the first set of cones. Shuffle sideways by 90 degrees to meet in the middle. Shuffle an entire circle around one other and then return back to the cones. Repeat for each pair of cones. Remember to stay tour toes and keep your centre of gravity low by bending your hips and knees.
5) Running: Shoulder Contact:
Run forwards in pairs to the first pair of cones. Shuffle sideways by 90 degrees to meet in the middle then jump sideways towards each other to make shoulder-to-shoulder contact. Note that to make sure you land on both feet with your hips and knees bent. Do not let your knees buckle inwards. Make it a full jump and synchronize your timing with your team-mate as you jump and land.
6) Running: Quick Forwards & Backwards:
As a pair, run quickly to the second set of cones then run backwards quickly to the first pair of cones keeping your hips and knees slightly bent. Keep repeating the drill, running two cones forwards and one cone backwards, Remember to take small, quick steps.
- Part 2: Strength, Plyometrics, and Balance (6 exercises – 10 mins). This is the core of the programme. It includes the plank, side plank, Nordic hamstring curl (progressed through levels), single-leg balance exercises, squats, and jumping drills with proper landing mechanics. These exercises target the trunk, hips, and hamstrings—the critical control centres for lower limb alignment.
Level 1
1) THE BENCH: STATIC
Starting position: Lie on your front, supporting yourself on your forearms and feet. Your elbows should be directly under your shoulders.
Exercise: Lift your body up, supported on your forearms, pull your stomach in, and hold the position for 20-30 sec. Your body should be in a straight line. Try not to sway or arch your back.
2) SIDEWAYS BENCH: STATIC
Starting position: Lie on your side with the knee of your lowermost leg bent to 90 degrees. Support your upper body by resting on your forearm and knee. The elbow of your supporting arm should be directly under your shoulder.
Exercise: Lift your uppermost leg and hips until your shoulder, hip and knee are in a straight line. Hold the position for 20-30 sec. Take a short break, change sides and repeat.
3) HAMSTRINGS: BEGINNER
Starting position: Kneel on a soft surface. Ask your partner to hold your ankles down firmly.
Exercise: Your body should be completely straight from the shoulder to the knee throughout the exercise. Lean forward as far as you can, controlling the movement with your hamstrings and your gluteal muscles. When you can no longer hold the position, gently take your weight on your hands, falling into a push-up position. Complete a minimum of 3-5 repetitions and/or 60 sec.
4) SINGLE-LEG STANCE: HOLD THE BALL
Starting position: Stand on one leg.
Exercise: Balance on one leg whilst holding the ball with both hands. Keep your body weight on the ball of your foot. Remember: try not to let your knees buckle inwards. Hold for 30 sec. Change legs and repeat. The exercise can be made more difficult by passing the ball around your waist and/or under your other knee.
5) SQUATS: WITH TOE RAISE
Starting position: Stand with your feet hip-width apart. Place your hands on your hips if you like.
Exercise: Imagine that you are about to sit down on a chair. Perform squats by bending your hips and knees to 90 degrees. Do not let your knees buckle inwards. Descend slowly then straighten up more quickly. When your legs are completely straight, stand up on your toes then slowly lower down again. Repeat the exercise for 30 sec.
6) JUMPING: VERTICAL JUMPS
Starting position: Stand with your feet hip-width apart. Place your hands on your hips if you like
Exercise: Imagine that you are about to sit down on a chair. Bend your legs slowly until your knees are flexed to approx. 90 degrees, and hold for 2 sec. Do not let your knees buckle inwards. From the squat position, jump up as high as you can. Land softly on the balls of your feet with your hips and knees slightly bent. Repeat the exercise for 30 sec.
Level 2
1) THE BENCH: ALTERNATE LEGS
Starting position: Lie on your front, supporting yourself on your forearms and feet. Your elbows should be directly under your shoulders.
Exercise: Lift your body up, supported on your forearms, and pull your stomach in. Lift each leg in turn, holding for a count of 2 sec. Continue for 40-60 sec. Your body should be in a straight line. Try not to sway or arch your back.
2) SIDEWAYS BENCH: RAISE & LOWER HIP
Starting position: Lie on your side with both legs straight. Lean on your forearm and the side of your foot so that your body is in a straight line from shoulder to foot. The elbow of your supporting arm should be directly beneath your shoulder.
Exercise: Lower your hip to the ground and raise it back up again. Repeat for 20-30 sec. Take a short break, change sides and repeat.
3) HAMSTRINGS: INTERMEDIATE
Starting position: Kneel on a soft surface. Ask your partner to hold your ankles down firmly.
Exercise: Your body should be completely straight from the shoulder to the knee throughout the exercise. Lean forward as far as you can, controlling the movement with your hamstrings and your gluteal muscles. When you can no longer hold the position, gently take your weight on your hands, falling into a push-up position. Complete a minimum of 7-10 repetitions and/or 60 sec.
4) SINGLE-LEG STANCE: THROWING BALL WITH PARTNER
Starting position: Stand 2-3 m apart from your partner, with each of you standing on one leg.
Exercise: Keeping your balance, and with your stomach held in, throw the ball to one another. Keep your weight on the ball of your foot. Remember: keep your knee just slightly flexed and try not to let it buckle inwards. Keep going for 30 sec. Change legs and repeat.
5) SQUATS: WALKING LUNGES
Starting position: Stand with your feet at hip-width apart. Place your hands on your hips if you like.
Exercise: Lunge forward slowly at an even pace. As you lunge, bend your leading leg until your hip and knee are flexed to 90 degrees. Do not let your knee buckle inwards. Try to keep your upper body and hips steady. Lunge your way across the pitch (approx. 10 times on each leg) and then jog back.
6) JUMPING: LATERAL JUMPS
Starting position: Stand on one leg with your upper body bent slightly forward from the waist, with knees and hips slightly bent.
Exercise: Jump approx. 1 m sideways from the supporting leg onto the free leg. Land gently on the ball of your foot. Bend your hips and knees slightly as you land and do not let your knee buckle inward. Maintain your balance with each jump. Repeat the exercise for 30 sec.
Level 3
1) THE BENCH: ONE LEG LIFT AND HOLD
Starting position: Lie on your front, supporting yourself on your forearms and feet. Your elbows should be directly under your shoulders.
Exercise: Lift your body up, supported on your forearms, and pull your stomach in. Lift one leg about 10-15 cm off the ground, and hold the position for 20-30 sec. Your body should be straight. Do not let your opposite hip dip down and do not sway or arch your lower back. Take a short break, change legs and repeat.
2) SIDEWAYS BENCH: WITH LEG LIFT
Starting position: Lie on your side with both legs straight. Lean on your forearm and the side of your foot so that your body is in a straight line from shoulder to foot. The elbow of your supporting arm should be directly beneath your shoulder.
Exercise: Lift your uppermost leg up and slowly lower it down. again. Repeat for 20-30 sec. Take a short break, change sides and repeat
3) HAMSTRINGS: ADVANCED
Starting position: Kneel on a soft surface. Ask your partner to hold your ankles down firmly.
Exercise: Your body should be completely straight from the shoulder to the knee throughout the exercise. Lean forward as far as you can, controlling the movement with your hamstrings and your gluteal muscles. When you can no longer hold the position, gently take your weight on your hands, falling into a push-up position. Complete a minimum of 12-15 repetitions and/or 60 sec.
4) SINGLE-LEG STANCE: TEST YOUR PARTNER
Starting position: Stand on one leg opposite your partner and at arm's length apart.
Exercise: Whilst you both try to keep your balance, each of you in turn tries to push the other off balance in different directions. Try to keep your weight on the ball of your foot and prevent your knee from buckling inwards. Continue for 30 sec. Change legs and repeat.
5) SQUATS: ONE-LEG SQUATS
Starting position: Stand on one leg, loosely holding onto your partner.
Exercise: Slowly bend your knee as far as you can manage. Concentrate on preventing the knee from buckling inwards. Bend your knee slowly then straighten it slightly more quickly, keeping your hips and upper body in line. Repeat the exercise 10 times on each leg.
6) JUMPING: BOX JUMPS
Starting position: Stand with your feet hip-width apart. Imagine that there is a cross marked on the ground and you are standing in the middle of it
Exercise: Alternate between jumping forwards and backwards, from side to side, and diagonally across the cross. Jump as quickly and explosively as possible. Your knees and hips should be slightly bent. Land softly on the balls of your feet. Do not let your knees buckle inwards. Repeat the exercise for 30 sec.
- Part 3: High-Intensity Running and Cutting (3 exercises – 2 mins). The final phase involves match-specific movements: bounding, plant-and-cut drills, and high-speed acceleration and deceleration. This phase bridges the gap between controlled exercise and the unpredictable demands of match play.
1) RUNNING: ACROSS THE PITCH
Run across the pitch, from one side to the other, at 75-80% maximum pace.
2) RUNNING: BOUNDING
Run with high bounding steps with a high knee lift, landing gently on the ball of your foot. Use an exaggerated arm swing for each step (opposite arm and leg). Try not to let your leading leg cross the midline of your body or let your knees buckle inwards. Repeat the exercise until you reach the other side of the pitch, then jog back to recover.
3) RUNNING: PLANT & CUT
Jog 4-5 steps, then plant on the outside leg and cut to change direction. Accelerate and sprint 5-7 steps at high speed (80-90% maximum pace) before you decelerate and do a new plant & cut. Do not let your knee buckle inwards. Repeat the exercise until you reach the other side, then jog back.
The programme exists in three levels of difficulty, allowing progression from novice to elite athletes. The entire protocol takes approximately 20 minutes and is intended to replace the usual warm-up before every training session and match.
Why Does It Work? The Physiotherapist's Perspective
Understanding the mechanism behind the FIFA 11+ is essential for clinicians and coaches who want to apply its principles intelligently. The programme works because it addresses the root causes of non-contact and indirect-contact injuries.
The Three Weak Links
In football, the majority of injuries don't happen because of a direct collision. They happen during acceleration, deceleration, cutting, landing, and pivoting—movements that place enormous demands on the kinetic chain. Three areas are particularly vulnerable:
- The Hamstrings. During sprinting, the hamstrings must eccentrically control the rapidly extending knee. If eccentric strength is insufficient, the muscle-tendon unit becomes overwhelmed. The Nordic hamstring exercise—a key component of FIFA 11+ Part 2—is one of the most effective interventions for building eccentric hamstring capacity.
- The Trunk and Hip Complex. Poor core and hip stability leads to dynamic valgus collapse at the knee position strongly associated with ACL injury. The plank, side plank, and single-leg balance exercises in FIFA 11+ train the athlete to maintain a stable pelvis and controlled knee alignment under load.
- Neuromuscular Control. Injuries often occur when the brain and muscles fail to communicate fast enough. Part 3 of the programme exposes athletes to high-speed cutting and reactive drills that demand rapid, coordinated muscle activation patterns. This trains the nervous system to respond appropriately in match situations.
Implementing the FIFA 11+ In Practice
The beauty of the FIFA 11+ lies in its accessibility. It requires no gym equipment, just a patch of grass and a ball. But implementation fidelity matters. Research shows that compliance is key: the protective effect of the programme is dose dependent. Teams that perform it consistently, at least twice per week, see the greatest benefit.
Here are some practical recommendations:
- Start at the appropriate level. FIFA 11+ has three levels. Begin at Level 1 and progress only when exercises can be performed with perfect technique.
- Quality over quantity. The programme is not a checklist to rush through. Each exercise, particularly the Nordic hamstring curl and single-leg balance variations, must be performed with precise alignment and control.
- Integrate it into the team culture. The warm-up should be a non-negotiable part of every session, not an optional add-on. When the entire squad participates, individual compliance improves.
- Use the official resources. FIFA provides free, downloadable posters, instruction manuals, and exercise cards through the FIFA 11+ Programme website. These resources are invaluable for ensuring correct exercise execution.
- Consider individual adaptations. Athletes with existing deficits—such as poor single-leg stability or a history of hamstring strain—may benefit from supplementary physiotherapy-guided exercises that complement the FIFA 11+ framework.
From the World Cup to Your Weekend Game
As you watch the World Cup this year, pay attention to the pre-match warm-up. What looks like a fluid series of drills is likely built on the very principles we've discussed. Elite teams have integrated neuromuscular injury prevention into their daily routines, and the evidence suggests it's paying dividends in reduced injury rates and extended player availability.
Why does this matter to you?
You don't need to be a professional to benefit. Because injury prevention doesn't just belong on elite pitches. The same principles of neuromuscular control, eccentric loading, and core stability apply whether you're playing 5-a-side on Sunday or chasing your kids around the park.
Twenty minutes. Three parts. A lifetime of safer, stronger football.
Ready to warm up differently? A physio can adapt this protocol specifically to your body, your sport, and your goals.
If you have questions about adapting the protocol to your specific needs, injury history, or performance goals, you are encouraged to make an appointment to seek guidance and advice from a professional physiotherapist or medical expert to obtain a proper diagnosis and appropriate treatment and optimise your approach.